There's a certain satisfaction in knowing you can hook up your trailer and hit the road with confidence, lights blazing and signals clear. And at the heart of this capability lies the humble four-wire trailer plug. Understanding its intricacies, the language of its colored wires, can transform a daunting task into a simple act of connection.
Connecting a four-wire trailer plug is more than just matching colors; it's about ensuring safety and compliance. It’s about understanding the flow of electricity, the purpose of each wire, and how they work together to create a seamless link between your vehicle and trailer. This guide will delve into the nuances of four-wire trailer plug wiring, providing you with the knowledge to confidently connect your trailer and embark on your next adventure.
The standardization of the four-wire trailer plug represents a significant advancement in trailer towing. Before its widespread adoption, connecting trailer lights was often a haphazard affair, with varying wire colors and configurations leading to confusion and potential safety hazards. The four-wire system brought order to the chaos, ensuring compatibility and simplifying the connection process for everyone.
The importance of correctly wiring a four-wire trailer plug cannot be overstated. A proper connection ensures the functionality of your trailer lights, including brake lights, turn signals, and running lights. This not only enhances your safety on the road but also the safety of other drivers. Improper wiring can lead to malfunctioning lights, short circuits, or even fires, posing significant risks. Furthermore, faulty trailer lights can result in traffic violations and fines.
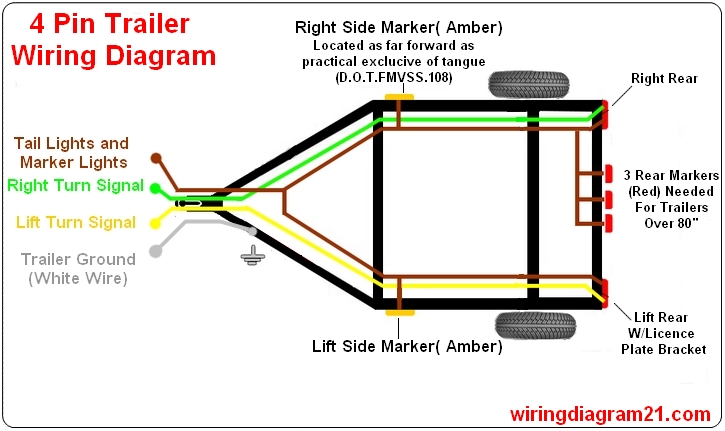
One of the main issues encountered when wiring a four-wire trailer plug is incorrect wire matching. Each wire color corresponds to a specific function: brown for running lights, yellow for left turn signal and brake light, green for right turn signal and brake light, and white for ground. Mixing up these connections can lead to a range of problems, from non-functional lights to potentially dangerous cross-wiring.
Let's define the role of each wire. The brown wire provides power to the trailer's running lights, illuminating the trailer at night. The yellow and green wires control the left and right turn signals and brake lights, respectively. The white wire serves as the ground, completing the electrical circuit and ensuring safe operation.
A correctly wired four-wire trailer plug offers several benefits. Firstly, it ensures the proper functioning of your trailer lights, increasing safety on the road. Secondly, it prevents electrical issues that could damage your vehicle or trailer. Thirdly, it provides peace of mind, knowing that your trailer is correctly connected and compliant with regulations.
Connecting a four-wire trailer plug involves a straightforward process. First, ensure you have the correct tools, including wire strippers, crimpers, and a tester. Next, identify the corresponding wires on your vehicle and trailer using the color code. Carefully strip the insulation from the ends of the wires and connect them using butt connectors or by soldering. Finally, test the connection to ensure all lights are functioning correctly.
Advantages and Disadvantages of DIY Wiring
| Advantages | Disadvantages |
|---|---|
| Cost Savings | Risk of Incorrect Wiring |
| Sense of Accomplishment | Potential for Damage |
Best Practice 1: Use Marine-Grade Wire for enhanced durability and corrosion resistance.
Best Practice 2: Use heat shrink tubing over your connections to provide additional insulation and protection.
Best Practice 3: Double-check all connections before finalizing the wiring process.
Best Practice 4: Always disconnect the battery before working on any electrical connections.
Best Practice 5: Consider using a circuit tester to verify correct functionality after wiring.
FAQ 1: What if my trailer has more than four wires? Answer: You'll likely need an adapter or a different wiring configuration.
FAQ 2: Can I wire a four-wire plug to a seven-wire connector? Answer: Yes, with an adapter.
In conclusion, mastering the art of four-wire trailer plug wiring empowers you with the ability to connect your trailer confidently and safely. Understanding the color codes, the function of each wire, and following the best practices outlined above will ensure a reliable connection and trouble-free towing experience. This knowledge not only enhances your safety but also contributes to the overall safety of everyone on the road. Invest the time to learn the intricacies of four-wire trailer plug wiring, and enjoy the peace of mind that comes with a properly connected trailer, ready for any adventure. By taking the initiative to learn this essential skill, you contribute to a safer and more enjoyable towing experience for yourself and others. Remember to always double-check your connections and consult with a professional if you have any doubts. Safe travels!
How To Wire Utility Trailer Tail Lights - Trees By Bike
Wiring A 7 Wire Trailer Plug - Trees By Bike
Trailer Plug And Wire - Trees By Bike
Trailer Light Diagram 4 Wire - Trees By Bike
how to wire a four wire trailer plug - Trees By Bike
Trailer Plug Wiring Diagram 7 Pin Flat - Trees By Bike
Basic 4 Wire Trailer Wiring Diagram at Emil Ward blog - Trees By Bike
Utility Trailer Wiring Diagram 4 Wire - Trees By Bike
How To Wire Lights On A Trailer - Trees By Bike
Rv Wiring Color Code - Trees By Bike
how to wire a four wire trailer plug - Trees By Bike
1977 f150 blinker and brake lights - Trees By Bike
Trailer Plug Wiring Diagram 4 Way - Trees By Bike
Wiring A Utility Trailer Lights - Trees By Bike
Four Wire Trailer Wiring - Trees By Bike


